In this article, we're introducing SSH-aware sockets with SSH session recording and session replay. It is part of the Mysocket long-term vision to introduce more application-aware proxies. Having these identity and application-aware proxies allows the Mysocket service to provide more granular authorization policies specific to applications as well as better reporting and logging. Make sure to also watch the demo recording of this feature
The advantage of an identity-aware, ssh proxy.
We've talked previously about SSH zero trust and had a few demo videos showing the power of zero trust private access for SSH use-cases. So what's different with today's improvement?
With the introduction of our SSH proxy, we actually speak the SSH protocol. This means we can look deeper into the protocol and traffic, which in turn allows us to understand what's happening on a per SSH session basis. As a result, we can start building application-specific policies and logging.
An example of an SSH-specific policy could include a user's SSH session being limited to only a "shell" session and prevent users from setting up SSH tunnels or do a Secure Copy (SCP). A great example of the power of application-specific logging is SSH session recording.
SSH session recording.
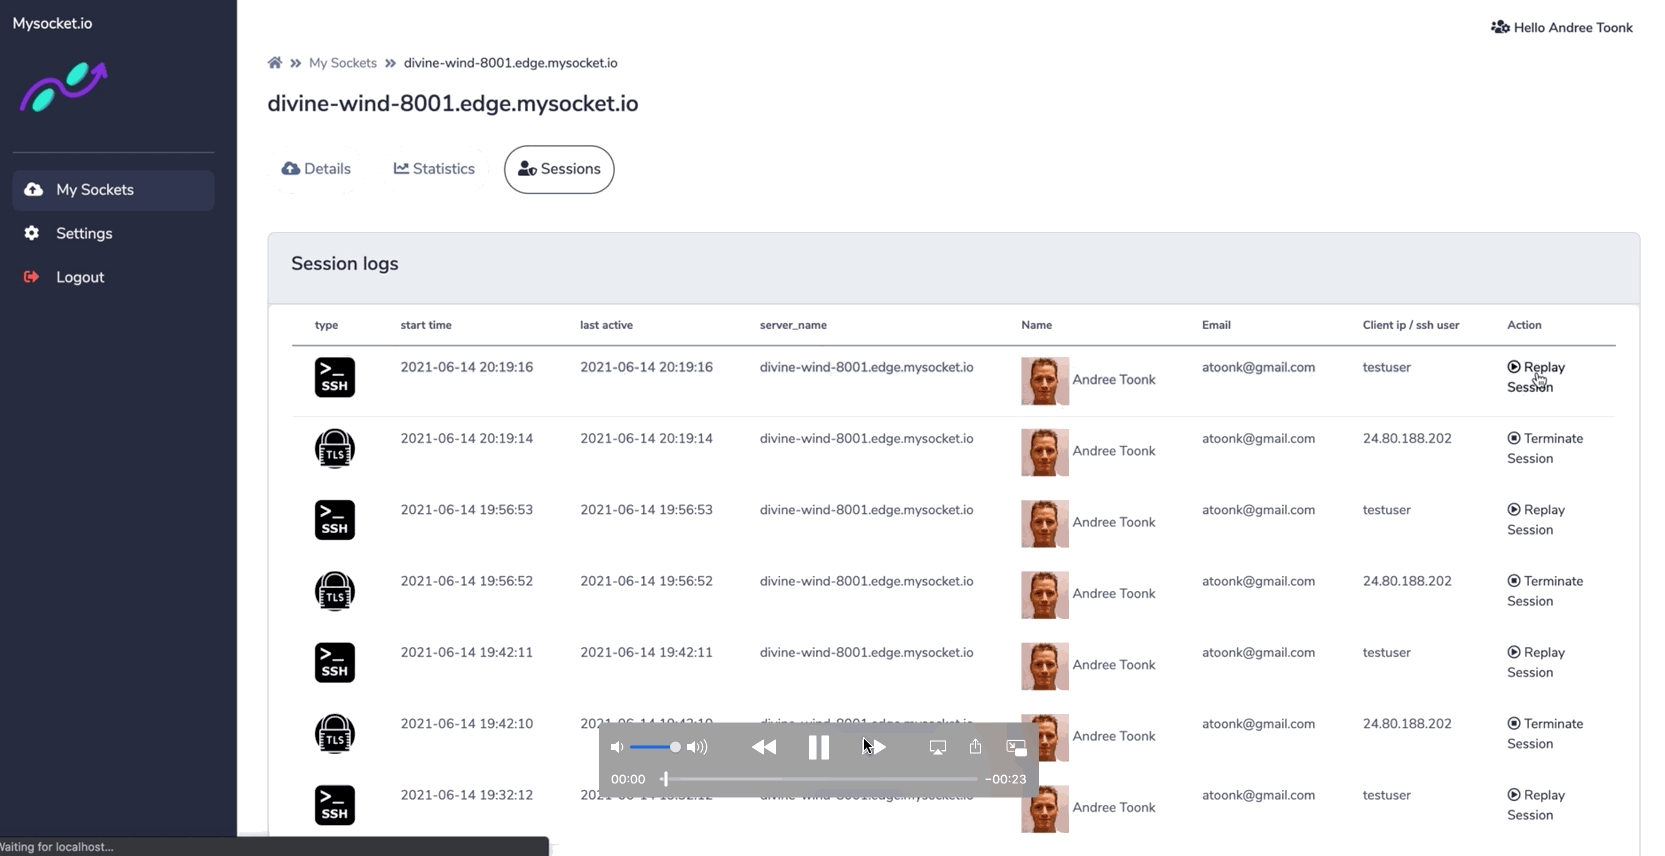
The newly introduced socket type "SSH" provides session recording for all SSH sessions passing through the Mysocket platform. These recordings can be reviewed later in the Mysocket portal.
This provides users with end-to-end visibility of activities happening in their network. And helps to answer the audit questions: what happened when, where, and by whom. Watch the demo below to see what it looks like!
The Use-Case for zero-trust private ssh access
More and more folks are moving to zero-trust private access solutions in favor of the traditional remote access VPN. This makes sense as we really should not trust users just because they come from a trusted IP range with lots of lateral access. This is further compounded by the fact that network boundaries are slowly disappearing as we deploy resources in various clouds and on-prem data centers. Therefore, we need to aim for granular access to only those resources that are required for a given time, identity, and policy.
We're all experiencing the change in work as more folks are now working from home or are otherwise remote. This is a way to meet the needs of an increasingly distributed technical workforce AND the needs of the SecOps team which is suffering from a lack of traditional visibility and control points!
There's also the pressure of teams going through the need for Compliance programs such as SOC2. As part of that, network control, key rotation, secret management, and auditing are all significant things to tackle. Using a zero-trust private access solution such as Mysocket will help teams on this journey. No longer are users logging in with system credentials or user-specific keys. Instead, we're using the user's Single Sign-on (SSO) credentials combined with short-lived, ephemeral SSH keys. Finally, we can record all sessions for auditing use-cases.
Set up and How it works
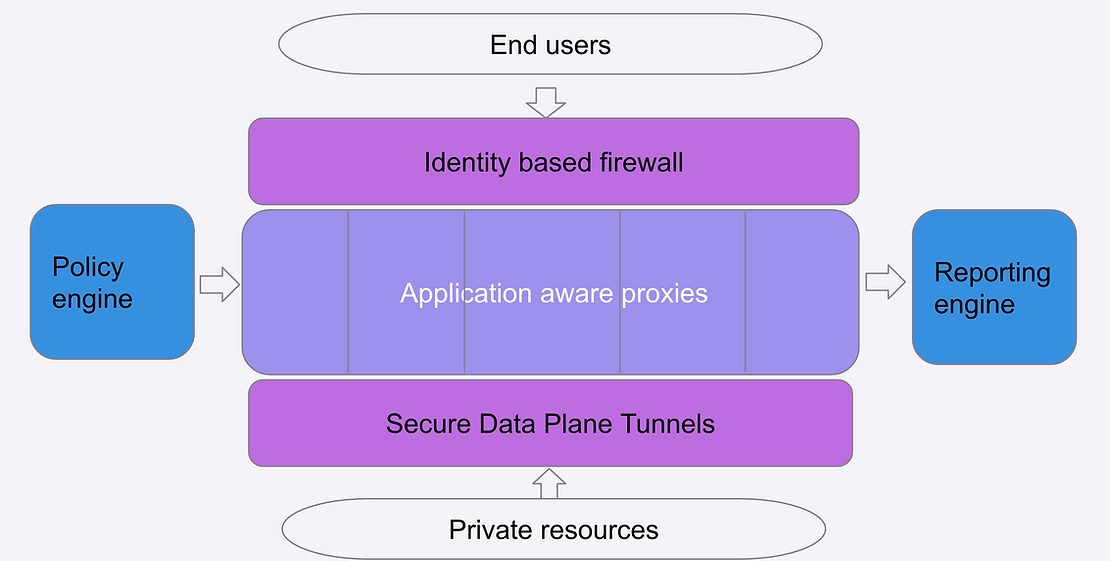
The diagram below shows all the components involved. For existing mysocket users, there's no real change other than to create a socket of type "SSH".

The SSH server
On the left, we have the SSH server the administrator wants to make available. The server sets up an encrypted outbound tunnel to the closest anycast mysocket edge server. Because of this, it can sit behind NAT, in a private data center, or for example, a private VPC; ie. no firewall changes needed.
The SSH client
On the right-hand side, we have the end-users. These are employees or contractors that need SSH access to the server. They have a small, lightweight helper client installed, this client makes sure the authentication workflow is kicked off. When the user initiates an SSH session, a browser window appears, and the user is asked to authenticate using their SSO credentials. If the user passes the authentication and authorization phase, signed TLS and SSH certificates are issued, which the user will use to authenticate itself.
Mysocket identity-aware SSH proxy
In the middle, we see the Mysocket SSH proxy, and it will use the SSH certificate information to authenticate and authorize the user. Finally, the client (downstream) and upstream connection to the SSH server are stitched together, and the session is live. While copying data between the upstream and downstream sessions, it's also logging all commands and terminal output so that it can later be played back. The proxy itself also authenticates itself to the upstream SSH server using SSH certificates.
If you'd like to give this a try yourself, all you need is to create an SSH socket using mysocketctl or using the portal. The last step is to configure your OpenSSH server to accept signed SSH certificates. Simply follow the 5 steps below to complete the configuration changes needed on the server.
On the Client machine, we’ll also add the following to our ssh client config file. This is a one-time setup and will ensure the ssh traffic to *.edge.mysocket.io is sent through the mysocketctl client tool, you can just copy this in your terminal and it will be added to your ssh config (~/.ssh/config).
These changes are similar as outlined in our earlier blog here
note that clients can also use the command below as an alternative when initiating the ssh session. This is a built-in ssh client in mysocketctl. No changes are needed to the client's ssh configuration when using this.
Wrapping up and looking forward
As network boundaries continue to disappear and the infrastructure your services run on become borderless, the need for zero-trust access solutions is ever more critical. The addition of an SSH proxy is another step in our journey of introducing more application-aware proxies to Mysocket. It's a vital part of our strategy to provide a zero-trust, easy-to-use, and easy-to-manage application-aware private access solution that will help improve our users' security, visibility, and compliance practices.
We're just starting to scratch the surface of what's possible now that we can do more application-specific access policies and logging. The example of SSH session recording as outlined in this blog is an excellent example of what's possible.


.png)

.png)

Ready to level up
your security?