In this article, we'll look at Mysocket's zero-trust cloud-delivered, authenticating firewall. Allowing you to replace your trusted IP ranges with trusted identities.
Last month we introduced our first zero trust features by introducing the concept of Identity Aware Sockets. It’s been great to see folks giving this a spin and start using it as a remote access alternative for the traditional VPN.
Most services out there today are HTTP based, typically served over HTTPS. However, there are a few other commonly used services that are not HTTP based and, as a result, up until today, didn’t benefit from our identity-aware sockets. In this article, we’ll introduce Zero trust support for non-HTTP based service, with the introduction Identity aware TCP sockets. Specifically, we’ll look at providing zero trust services for SSH as an example.
Determining the user’s identity, authentication, and authorization
Turning your mysocket services into an identity-aware socket is as simple as adding the — cloud_authentication flag to mysocketctl when creating the service. While doing so, you have the ability to add a list of email domains and/or a list of email addresses. Now each time a user tries to access your service, a browser will pop up asking the user to authenticate. Once authentication is finished, we know the user’s identity, and if that identity matches the list of authorized users, only then will the user be let through.
If you think about what is happening here, you’ll realize that what we have here is a per session, authenticating firewall. Only after the user is authenticated and authorized do we allow the network traffic through. Notice that this is much more advanced than your traditional firewall; now, every network flow has an identity. That’s powerful!
This flow of redirecting users to authenticate and then back to the service was do-able because it’s done in the browser and largely built of HTTP session management. Now we’d like to extend this with non-HTTP services, so we’ll need to find an alternative for the HTTP session part. The solution for this comes with the help of Mutual TLS (MTLS). MTLS forces the client to authenticate itself when talking to the server. This is achieved by presenting a signed client certificate to the server.
Identity aware TCP sockets
With the introduction of identity-aware TCP sockets, the mysocket edge proxies act as an authenticating firewall. Since we are relying on client TLS certificates, all traffic is securely tunneled over a TLS connection.
As you can see in the flow below, there are a few actions to take before the user can get through. To make this a seamless experience for the users of your service, we’ve extended the mysocketctl command-line tool with the required functionality that kicks of the authentication flow. It starts the authentication process; after that, it requests a client certificate (your ticket in), and then it sets up the TLS tunnel for you. After that, users can send traffic over this authenticated and encrypted tunnel. In its simplest form, it will look something like this:
In the example above, we’re sending the string hello, to the service served by muddy-pond-7106.edge.mysocket.io.
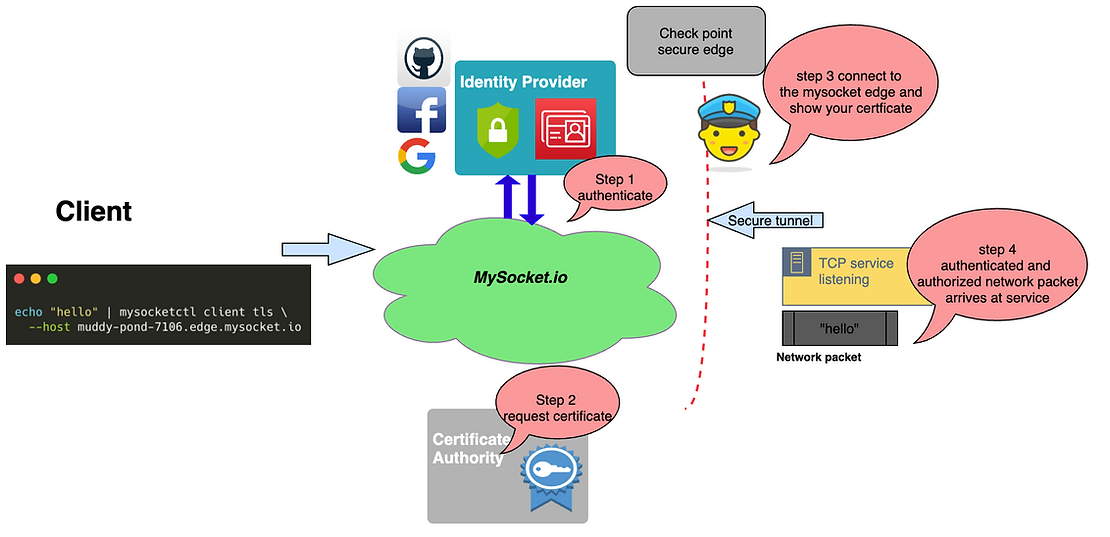
Before the string “hello” arrives at the service protected by mysocket, the mysocketctl client will take care of the authentication flow, requests the TLS client certificate, and sends whatever comes in over stdin to the mysocket edge services.
SSH zero trust
Now that we understand the high-level flow let’s look at a more practical example. In this example, we have a server for which I’d like to make the SSH service available to only a subset of users. The ssh is on a private network such as your corporate network, your home network, or even in a private VPC or just firewalled off from the Internet.
First, we’ll provision the service using mysocketctl on the server-side and set up the tunnel.
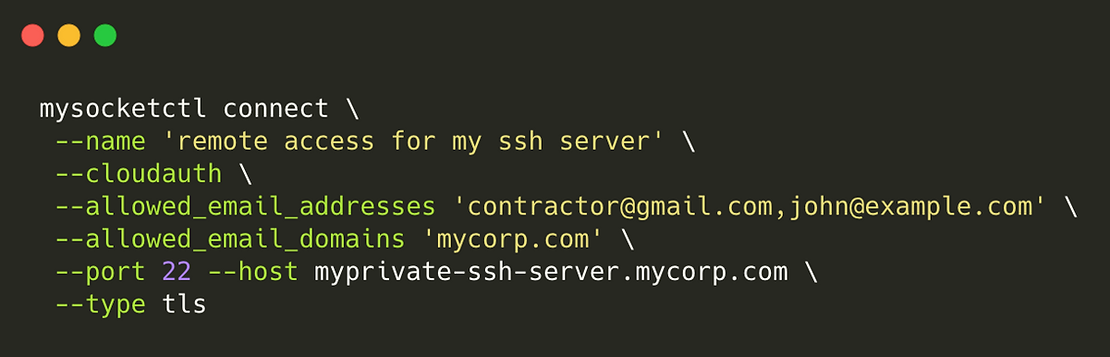
In this example, I'm creating a mysocket service of type TLS, and we enable cloud authentication. This will force the user to present a valid client TLS certificate. The certificate can only ever be handed out to users that authenticate with a mycorp.com email address or using the specific email addresses contractor@gmail.com.
The same command will also set up a secure tunnel to the closest mysocket tunnel servers and expose the ssh service running on port 22.
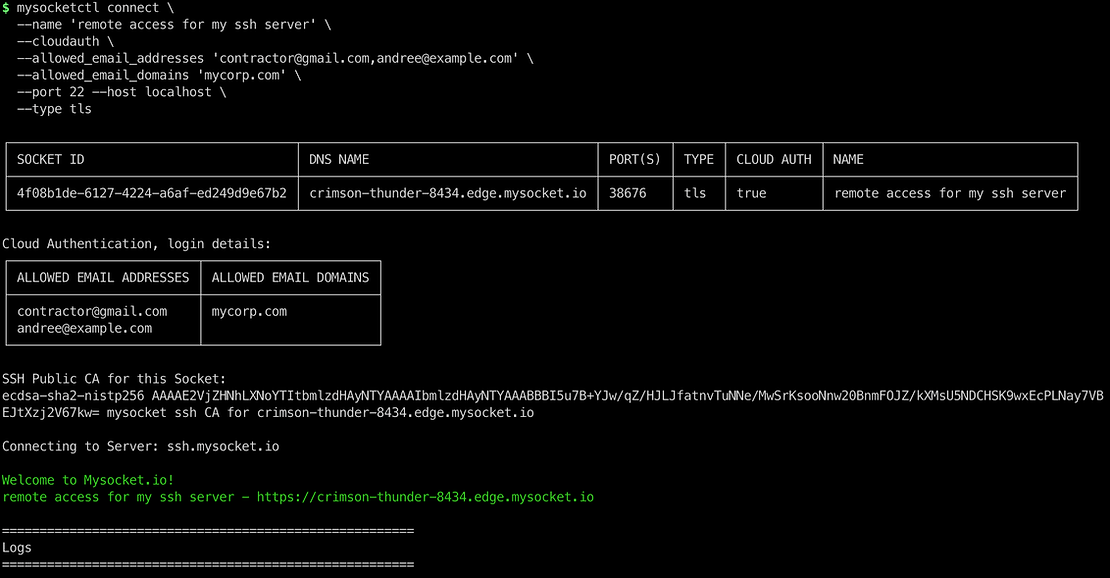
The result is that this SSH service is now accessible to allowed users only, as crimson-thunder-8434.edge.mysocket.io:38676 Only inbound traffic with a valid client TLS ticket will be let through. Valid TLS client certificates will only ever be issued to users with a mycorp.com domain or the two contractor email addresses we specified.
Setting up an SSH session
Ok, time to test this and connect to this ssh service. Remember that we need a valid TLS client certificate. These are issued only with a valid token, and the token is only handed out to authorized users. To make all of this easier, we've extended the border0 cli tool (previously known as mysockectl) to take care of this workflow. The example below shows how we use the ssh ProxyCommand to make that easier for us, like this.
This will tell ssh to send all ssh traffic through this mysocketctl client command. This will start the authentication process, fetch the TLS client certificate for us, set up the TLS tunnel to the mysocket edge server, and transport the ssh traffic through this authenticated tunnel. The user can now log in to the ssh server using whatever method you’re used to.
With this, we’ve made our private ssh server accessible from the Internet, while the authenticating mysocket firewall is only allowing in session from client identities we approved beforehand. No VPN needed. Pretty cool, right?
Mysocket SSH Certificate authorities.

SSH is quite similar to TLS in terms of workflow. It too supports authenticating users using signed certificates.
So we decided to expand on this functionality. In addition to an API endpoint that is responsible for signing TLS certificates, we also created one for signing SSH keys.
If we build on the example above, the user can now, in addition to requesting a TLS client certificate, also request a signed SSH certificate. Our SSH certificate signing service will only sign the signing request if the user is authenticated and authorized, using the same logic as before.
Setting up the server
In order to use this, we’ll need to make a few minor changes to the SSH server. The configuration changes below are needed to enable authentication using CA keys.
Finally, also make sure to get the Public key for the CA (border0 socket show) and copy it into the ca.pub file (/etc/ssh/ca.pub).
Now the server is configured to work with and allow authentication based on signed SSH keys from the mysocket certificate authority. Note that all signed certificates will have two principles, the email address of the authenticated user, as well as ‘mysocket_ssh_signed’. In the example configuration above, we told the server to map users with the principle ‘mysocket_ssh_signed’ to the local user ubuntu.
Now we’re ready to connect, but instead of making the ssh command even longer, I’m going to add the following to my ssh config file ~/.ssh/config
The above will make sure that for all ssh sessions to *.edge.mysocket.io we start the authentication flow, fetch a TLS client certificate, and set up the TLS tunnel. We’ll also submit an SSH key signing request, which will result in a short-lived signed SSH certificate that will be used for authenticating the SSH user.
Now the user can just SSH like this, and the whole workflow will kick-off.
ssh ubuntu@crimson-thunder-8434.edge.mysocket.io
For those interested, the ssh certificate will end up in your ~/.ssh/ directory and will look something like this.
With this, users can SSH to the same server as before, but the cool thing is that the server won’t need to know any traditional known credentials for its users. Things like passwords or a public key entry in the authorized_keys file belong to the past. Instead, with the help of the border0 cli, the user will present a short-lived signed ssh certificate, which the server will trust.
With this, we achieved true Single Sign-on (SSO) for your SSH servers. Since the certificates are short-lived, five minutes in the past(to allow for time drift) to five minutes in the future, we can be sure that for each log-in the authentication and authorization flow was successful.
Give it a try yourself using my SSH server
If you’re curious about what it looks like for the user and want to give it a try? I have a test VM running on 165.232.143.236, it has firewall rules to prevent SSH traffic from the Internet, but using mysocket, anyone with a gmail.com account can access it. I encourage you to give it a spin, it will take you less than a minute to set up, just copy-paste the one-time setup config.
Onetime setup
If you’re using a Mac laptop as your client, you’ll need the border0 cli tool which will request the short-lived certs and will setup up the TLS tunnel. To install the client just copy-paste the below (for Mac only, see download.border0.com for other platforms).
To make it easy to use we’ll add the following to our ssh client config file. This is a one-time setup and will make sure the ssh traffic to *.edge.mysocket.io is sent through the border0 cli client tool, you can just copy this in your terminal and it will be added to your ssh config (~/.ssh/config).
Now you should be able to ssh to my test server using
ssh testuser@frosty-feather-1130.edge.mysocket.io
When the browser pops up, make sure to use the “log in with Google” option, as this socket has been configured to only allow identities that have a Gmail.com email address.
Wrapping up
In this post, we showed how we continued to build on our previous work with “identity-aware sockets”. We Introduced support for identity-aware TCP sockets, by leveraging TLS tunnels and Mutual TLS for authentication.
I like to think of this as a cloud-delivered, authenticating firewall. With this, we can make your services available to the Internet on a very granular basis, and make sure that each flow has an identity attached to it. Ie, we know exactly, on a per TCP flow basis, what identity (user) is using this flow. That’s a really powerful feature when compared to a traditional firewall, where we had to allow SSH traffic from certain network ranges that were implicitly trusted. What we can now do with these identity-aware sockets is rewrite these firewall rules and replace the trusted IP ranges with trusted identities. This is incredibly powerful for those that need strict compliance, and need to answer things like, who (not an IP, but an identity) connected to what when.
We looked at how this can be used to provide zero trust remote access to your SSH servers. And how it can be further extended by using the new SSH key signing service.
That’s it for now. I hope you found this interesting and useful. As always, if you have any questions or feedback, feel free to reach out.
Hungry for more? check out all our demo's on Youtube here


.png)

.png)

Ready to level up
your security?